Author Topic: 67 Dearborn Sound Deadener & Seam sealer references  (Read 4861 times)

Offline brennancarey

  • Full Member
  • ***
  • Posts: 109
67 Dearborn Sound Deadener & Seam sealer references
« on: July 11, 2017, 12:12:34 PM »
Hi

I am planning to do my interior seam sealing and Sound Deadener this weekend.  ;D ;D

I am needing some help pls and reference pics to follow  for my 67 Dearborn Fastback.

Areas that I understand need sound deadener / Seam sealing are the :

1. A Pillar
2. Cowl
3. Front floor panel where it meets the bottom of firewall
3. Floor where it meet the rocker panel
4. Rear of floor panel  by the 3rd member tunnel
5. Rear Seat tabs
6. Wheel house where it meets the floor
7. Truck Wheelhouse
8. Gas tank drop down area
9. Trunk Quarter panels
10 Rear tail light panel

Any other areas I am forgetting ?

I know a long list but I cant seem to find any reference for the above.

Thks!
Brennan

67 GTA 390 Fastback
Dark Moss Green
Dearborn
Build Date 12/28/66

Offline Coralsnake

  • Global Moderator
  • Hero Member
  • ****
  • Posts: 867
Re: 67 Dearborn Sound Deadener & Seam sealer references
« Reply #1 on: July 11, 2017, 11:57:25 PM »
One good place to start might be the weld and sealant manual.

:-)

Offline J_Speegle

  • Administrator
  • Hero Member
  • *****
  • Posts: 24164
Re: 67 Dearborn Sound Deadener & Seam sealer references
« Reply #2 on: July 12, 2017, 05:29:20 AM »
That is a list.

You have at least 4-6 different products and a ton of locations.  But we'll focus just on your list  ;) Don't have as many pictures for 67 for Dearborn but there are some. Just not something that can be put together in an organized fashion in a couple of hours

Good thing is that the interior sound deadener and sealants will not be seen so many don't pay as much attention to those unfortunately because of that I've not taken as many pictures of those areas since I've rarely gotten requests for them

Unfortunately the Assembly manuals will show you where Ford wanted the sealants to go not where workers placed them  And if you follow the manuals there are a number of areas that will not look like any original car you will ever find.  They can help with the sealant products as to type and characteristics which can be studied and compared to what your planning on using. In some areas your going to want to use a self leveling paintable sealer while in others an elastomertic product will be a better choice

I'll see what I can find and post this disconnect of PhotoBucket, trying to save those pictures and replace them here has taken some of my time since it happened. Haven't even got them posted up to the the gallery here in an organized fashion yet  :(
Jeff Speegle

Anything worth doing is worth doing concours ;)

Offline brennancarey

  • Full Member
  • ***
  • Posts: 109
Re: 67 Dearborn Sound Deadener & Seam sealer references
« Reply #3 on: July 12, 2017, 06:09:08 AM »
Hi Jeff

thank you for your feedback and input, I do realise its a long list.. Maybe we can break down in sections starting from back to front ? 
Also does not help as I am in South Africa so I dont have much to reference as there are no originals here for me to eyeball..  :-[

Ntd on the assembly manuals and that was my thoughts and concerns as well....

I am planning to start with the trunk so that would be a good place to start for me if you can help, ntd on the photo bucket issue must be giving you plenty grey hairs !
67 GTA 390 Fastback
Dark Moss Green
Dearborn
Build Date 12/28/66

Offline J_Speegle

  • Administrator
  • Hero Member
  • *****
  • Posts: 24164
Re: 67 Dearborn Sound Deadener & Seam sealer references
« Reply #4 on: July 13, 2017, 07:21:10 PM »
Hi Jeff

thank you for your feedback and input, I do realise its a long list.. Maybe we can break down in sections starting from back to front ?  .............I am planning to start with the trunk so that would be a good place to start for me if you can help, ntd on the photo bucket issue must be giving you plenty grey hairs !

Sounds like a plan.  Little bits of the larger list

Trunk seams and sealant

Sure you will notice the area where contact and wear has altered the condition of the sealants over time. Some area have been highlighted to help visualize edges and coverage. Labeled for follow up questions or discussions if needed.

Hope this helps

T1 Smooth not brushed or sprayed


T2 Smooth not brushed or sprayed


T3


T4 Smooth not brushed or sprayed


T5


T6 Sound deadener  Upper edge. Edges fairly sharp for a spray


T7 No noticable spray pattern inside the application. Pretty consistent across the spray surface


T8


T9 Wheel well to trunk floor Trap door surround to trunk floor sealant - Sprayed fairly heavy


T10 Trap door surround to trunk floor sealant - Sprayed fairly heavy


T11 Trunk floor seams. Wide spray sealants


T12

Jeff Speegle

Anything worth doing is worth doing concours ;)

Offline brennancarey

  • Full Member
  • ***
  • Posts: 109
Re: 67 Dearborn Sound Deadener & Seam sealer references
« Reply #5 on: July 16, 2017, 09:32:07 AM »
Thks Jeff.. Your help is very valuable... !

I did the trunk sealer and sound deadener this weekend, used Spectrum for all.

I think I am on the right track (i hope 8))

I also started with doing the rear wheel house, I had some references as the old sealer was still good on the one wheel house.

Any suggestions, critique most welcome, I would rather know now and fix before I get any further down the road. I do know I still need to feather in to get the overspray effect.

Thks!
Brennan
« Last Edit: July 16, 2017, 09:35:18 AM by brennancarey »
67 GTA 390 Fastback
Dark Moss Green
Dearborn
Build Date 12/28/66

Offline J_Speegle

  • Administrator
  • Hero Member
  • *****
  • Posts: 24164
Re: 67 Dearborn Sound Deadener & Seam sealer references
« Reply #6 on: July 16, 2017, 08:25:15 PM »
Any suggestions, critique most welcome, I would rather know now and fix before I get any further down the road. I do know I still need to feather in to get the overspray effect.

Yes in the the areas that were sprayed your going to need to go over the Sludge with a paintable spray rattle can sealer to give it the final sprayed look with all the spits and splatters

Need rear wheel well pictures?

Remember to apply it in patterns (using a large wide bush). Apply the material to the thickness you want. then dip and lift the brush while holding the brush as the worker would the application wand moving the brush in the direction of travel then dipping, lifting and moving it again and again across the panel then starting on the next pass one side to the other. Also remember to get some of the start or end of each pass on the frame rail so you don't get the magical (only on the wheel well) ok :(
Jeff Speegle

Anything worth doing is worth doing concours ;)

Offline brennancarey

  • Full Member
  • ***
  • Posts: 109
Re: 67 Dearborn Sound Deadener & Seam sealer references
« Reply #7 on: July 18, 2017, 07:13:44 AM »
Yes in the the areas that were sprayed your going to need to go over the Sludge with a paintable spray rattle can sealer to give it the final sprayed look with all the spits and splatters

Need rear wheel well pictures?

Remember to apply it in patterns (using a large wide bush). Apply the material to the thickness you want. then dip and lift the brush while holding the brush as the worker would the application wand moving the brush in the direction of travel then dipping, lifting and moving it again and again across the panel then starting on the next pass one side to the other. Also remember to get some of the start or end of each pass on the frame rail so you don't get the magical (only on the wheel well) ok :(

Hi , Luckly my rear wheel wells are still quite original together with the rear frame rails.

I took some detailed pics of the back section of the floor pan however I dont know how the seatbelt attachment points need to be sealed as well as if their is any sealing done where the floor pan meets the rockers as well as I have no clue on how the floor pan meets the firewall seam should look.
 These areas are a bit of a mystery to me :

1. A Pillar
2. Cowl
3. Front floor panel where it meets the bottom of firewall
4. Floor pan where it meets the rocker panel
5. Rear Seat tabs
Any help in that regard will be helpful.. Thks!

« Last Edit: July 18, 2017, 04:10:15 PM by brennancarey »
67 GTA 390 Fastback
Dark Moss Green
Dearborn
Build Date 12/28/66

Offline J_Speegle

  • Administrator
  • Hero Member
  • *****
  • Posts: 24164
Re: 67 Dearborn Sound Deadener & Seam sealer references
« Reply #8 on: July 18, 2017, 08:18:07 PM »
1. A Pillar
2. Cowl

Black light spray was added after paint (all other done before) to seal wiring clips


Cowl outer edge - smooth flowing possibly sort of self leveling


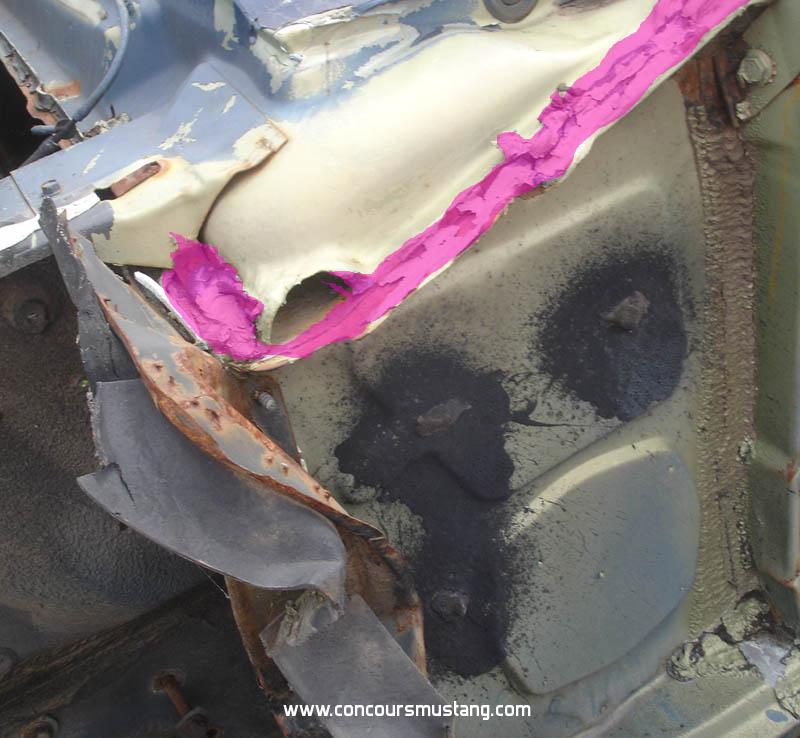
Cowl side to A pillar/door jamb sealant. Similar product as used on the seams and trunk seams


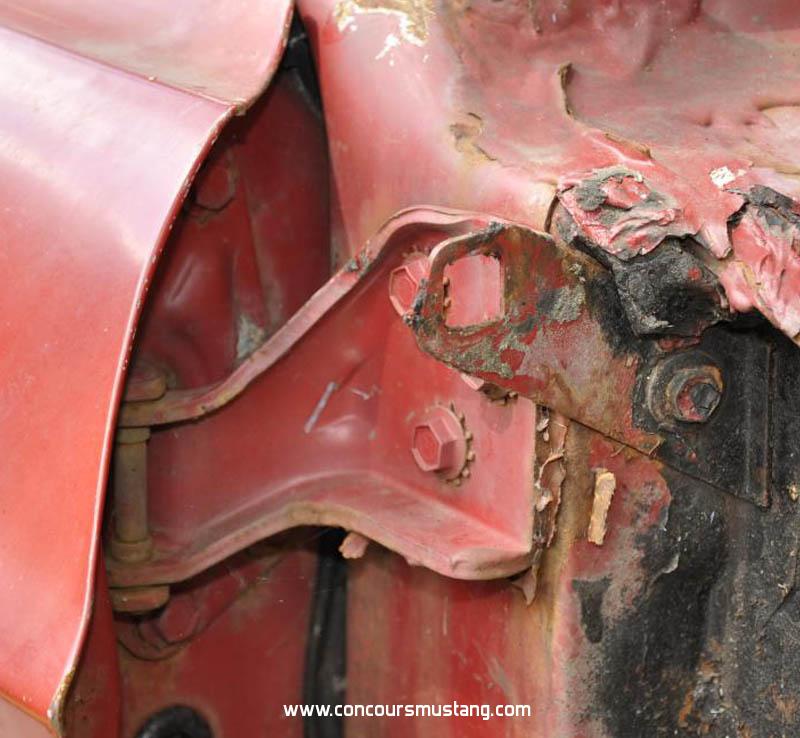
Door hinge to a pillar. Smooth chalk spread again  Looks similar to the taillight panel to trunk floor and rear bumper support product


3. Front floor panel where it meets the bottom of firewall [/quote]

Guess your referring to the interior as the undercarriage side typically didn't get any

Don't have a picture but typical would be a 4-5" wide sprayed pattern over the seam. Same along the front top and rear edge of the seat riser to driveline tunnel


4. Floor pan where it meets the rocker panel [/quote] Not sealed in the interior but instead on the undercarriage side. Arrows show the best section that shows width and thickness. Ignore the dealer applied undercoating


5. Rear Seat tabs [/quote]

Not sealed in the interior but instead on the undercarriage side on the inner points only

Spray product applied to the general area - sloppy


Extra. Trunk drop to quarter panel seam. Not found on all examples but appears it was suppose to be this year and plant  during this time period


Jeff Speegle

Anything worth doing is worth doing concours ;)

Offline brennancarey

  • Full Member
  • ***
  • Posts: 109
Re: 67 Dearborn Sound Deadener & Seam sealer references
« Reply #9 on: July 20, 2017, 04:49:04 PM »
Thks Jeff... as usual your help is appreciated and invaluable. Will tackle on the weekend and report back with my progress !

67 GTA 390 Fastback
Dark Moss Green
Dearborn
Build Date 12/28/66

Offline J_Speegle

  • Administrator
  • Hero Member
  • *****
  • Posts: 24164
Re: 67 Dearborn Sound Deadener & Seam sealer references
« Reply #10 on: July 20, 2017, 07:32:33 PM »
Remember that the the undercarriage (this year and plant) were applied after the floor paint/primer was applied not before like in the trunk, interior and many other locations.

Don't want you to get ahead of yourself  ;)
Jeff Speegle

Anything worth doing is worth doing concours ;)

Offline brennancarey

  • Full Member
  • ***
  • Posts: 109
Re: 67 Dearborn Sound Deadener & Seam sealer references
« Reply #11 on: July 25, 2017, 05:16:58 PM »
Weekends work..

Finished up the floor did the blending of the sludge with overspray.  I hope I am on the right track.. ?   

Then I started on the A Pillars and cowl.

Comments as always are welcome and appreciated !
67 GTA 390 Fastback
Dark Moss Green
Dearborn
Build Date 12/28/66

Offline J_Speegle

  • Administrator
  • Hero Member
  • *****
  • Posts: 24164
Re: 67 Dearborn Sound Deadener & Seam sealer references
« Reply #12 on: July 25, 2017, 07:17:50 PM »
Looking good. Haven't normally seen sealer around the rear seat upper bracket on top of the wheel housing.

And you left a few J clips in place when you painted ;)   but no one will see these once the car is wrapped up. The top sealer at the pillar top of cowl is allot prettier than the in worker would have done. But its typical that we would be this way after all the time and effort spent on our cars   Just something to watch for elsewhere where its seen
Jeff Speegle

Anything worth doing is worth doing concours ;)

Offline brennancarey

  • Full Member
  • ***
  • Posts: 109
Re: 67 Dearborn Sound Deadener & Seam sealer references
« Reply #13 on: July 26, 2017, 04:30:40 AM »
Looking good. Haven't normally seen sealer around the rear seat upper bracket on top of the wheel housing.

And you left a few J clips in place when you painted ;)   but no one will see these once the car is wrapped up. The top sealer at the pillar top of cowl is allot prettier than the in worker would have done. But its typical that we would be this way after all the time and effort spent on our cars   Just something to watch for elsewhere where its seen

A wise man on these forums once told me that  I need to look at what my car had and take photos, and that if the sealer does not need to be removed dont remove it. 8) 8)  See attached images I took of the original sealer around the rear upper seat bracket. Thats why I left it and just feathered in the overspray. Interested to hear your comments ?

J clips- ok I will remove and fix sharp edges, thanks for spotting..
67 GTA 390 Fastback
Dark Moss Green
Dearborn
Build Date 12/28/66

Offline J_Speegle

  • Administrator
  • Hero Member
  • *****
  • Posts: 24164
Re: 67 Dearborn Sound Deadener & Seam sealer references
« Reply #14 on: July 26, 2017, 02:53:14 PM »
A wise man on these forums once told me that  I need to look at what my car had and take photos, and that if the sealer does not need to be removed dont remove it. 8) 8)  See attached images I took of the original sealer around the rear upper seat bracket. Thats why I left it and just feathered in the overspray. Interested to hear your comments ?

Great idea  8)  Understand and of course we will likely have plenty of people that will read your thread here and simply copy what you did. Only wanted to mentioned what IMHO is "normal"  or typical so that they don't automatically just copy.  The fact that your car was built that way is great and shows the variations that we often uncover it we pay attention and document things as we go

 
Jeff Speegle

Anything worth doing is worth doing concours ;)