Author Topic: December 1965 Dearborn Paint Process  (Read 5482 times)

Offline Building 3

  • Sr. Member
  • ****
  • Posts: 351
December 1965 Dearborn Paint Process
« on: April 24, 2014, 10:45:21 AM »
I have researched all of the posts on primer and painting and I just want to make sure I have it correct as the painting of my car will start shortly. So please comment and correct my assumptions.  For a December 1965 Dearborn convertible 289 2V scheduled to be built on 12/27/65:
1.When the car left the body shop (doors, hood, front fenders and valence panels were not installed at this time) the first process was to hand spray red oxide primer over all bare metal surfaces except the floor pan which was sprayed mechanically with jets with glossy black from underneath. The red oxide application was uniform throughout the exterior panels, interior, trunk, engine compartment, and interior, while the floor pan had black paint drips because the spray was close to the floor pan and applied with pressure from the jets.
2. The interior panels that would be exposed after the car was built were painted: instrument panel, A-pillars, texture on interior of doors. These were then masked off to prevent exterior paint from being sprayed on them.
3. Gray sealer/primer hand sprayed to the exterior panels and trunk that would receive the final top coat paint color. Some overspray would be found on the interior panels and engine compartment near the cowl area which were not masked off.
4. Sound deadener applied to the rear wheel wells and the inside of the rear quarter panels.
5. Exterior paint hand sprayed to all exterior panels and the entire trunk area.  This was a uniform application. There is overspray on to the black underbody almost to the driveshaft/transmission tunnel. The painter painted everything side to side and up and down so the rear wheel well black out would have been mostly covered.  There was no effort to keep these areas "black." Q: But was there an effort to apply a uniform application of the exterior color paint to the  interior sheet metal that was not masked off, or was this just overspray from the exterior panels?
6. The rocker hem flange was spray painted flat to satin black prior to the front fenders being installed.  There was overspray on to the gloss black underbody.
7. The engine compartment was masked off and painted semi-gloss black.  Both the interior panels of the engine compartment were painted as well as the outside of the inner fenders. At the firewall, there would be a transition as it went down to the transmission tunnel where the engine compartment black out may not have completely covered the area.
8. After the front fenders were installed and just prior to the wheel/tire assembly being installed, sound deadener was applied to the inner front fenders.  The application would cover the outside of the inner fenders and the inside of the outer fenders.  The spray would also be applied to the suspension components that "got in the way." That is, no effort was made to mask off these components.
Do I have this process correct as to application and over spray? The painting will start soon! Thank you, Tom
1966 289 C code auto convertible December 1965 scheduled build at Dearborn.

1966 289 C code auto convertible
October 1965 scheduled build at Metuchen.

Offline J_Speegle

  • Administrator
  • Hero Member
  • *****
  • Posts: 24232
Re: December 1965 Dearborn Paint Process
« Reply #1 on: April 24, 2014, 11:16:40 PM »
I have researched all of the posts on primer and painting and I just want to make sure I have it correct as the painting of my car will start shortly. So please comment and correct my assumptions.  For a December 1965 Dearborn convertible 289 2V scheduled to be built on 12/27/65:
1.When the car left the body shop (doors, hood, front fenders and valence panels were not installed at this time) the first process was to hand spray red oxide primer over all bare metal surfaces except the floor pan which was sprayed mechanically with jets with glossy black from underneath. The red oxide application was uniform throughout the exterior panels, interior, trunk, engine compartment, and interior, while the floor pan had black paint drips because the spray was close to the floor pan and applied with pressure from the jets.

Correct as we understand the process though I would say that it was likely not black applied from below but a very dark batch color ;)

Many sealer were applied before any primer sealers while others appear to be after. Don't know for sure which ones were one in what order on  66 Dearborn
cars of this time period

2. The interior panels that would be exposed after the car was built were painted: instrument panel, A-pillars, texture on interior of doors. These were then masked off to prevent exterior paint from being sprayed on them.

+1


3. Gray sealer/primer hand sprayed to the exterior panels and trunk that would receive the final top coat paint color. Some overspray would be found on the interior panels and engine compartment near the cowl area which were not masked off.

Some gray primer overspray may be found on the interior panels and engine compartment near the cowl area which were not masked off. but none may be visible on finished painted car due to exterior color being applied over it


4. Sound deadener applied to the rear wheel wells and the inside of the rear quarter panels.

Can't confirm (doesn't make a difference in the finished product) if this step came before or after step #3 Also sealers and sound deadener appears to have been applied to the firewall sections visible in the front wheel well


5. Exterior paint hand sprayed to all exterior panels and the entire trunk area.  This was a uniform application. There is overspray on to the black underbody almost to the driveshaft/transmission tunnel. The painter painted everything side to side and up and down so the rear wheel well black out would have been mostly covered.  There was no effort to keep these areas "black."

After the gray primer application but before exterior color was applied the rear bumper guard brackets and rear valance was attached to the taillight panel with all mounting screws but left hanging (not attached at the bottom)


Depending on the time period workers crawled into the cars and applied body color into the interior panels and then the door jambs before starting on the exterior panels 

Painter also "typically" applied body color forward of the cowl to at least the shock tower area on the top inner fender lip and in the front wheelwell


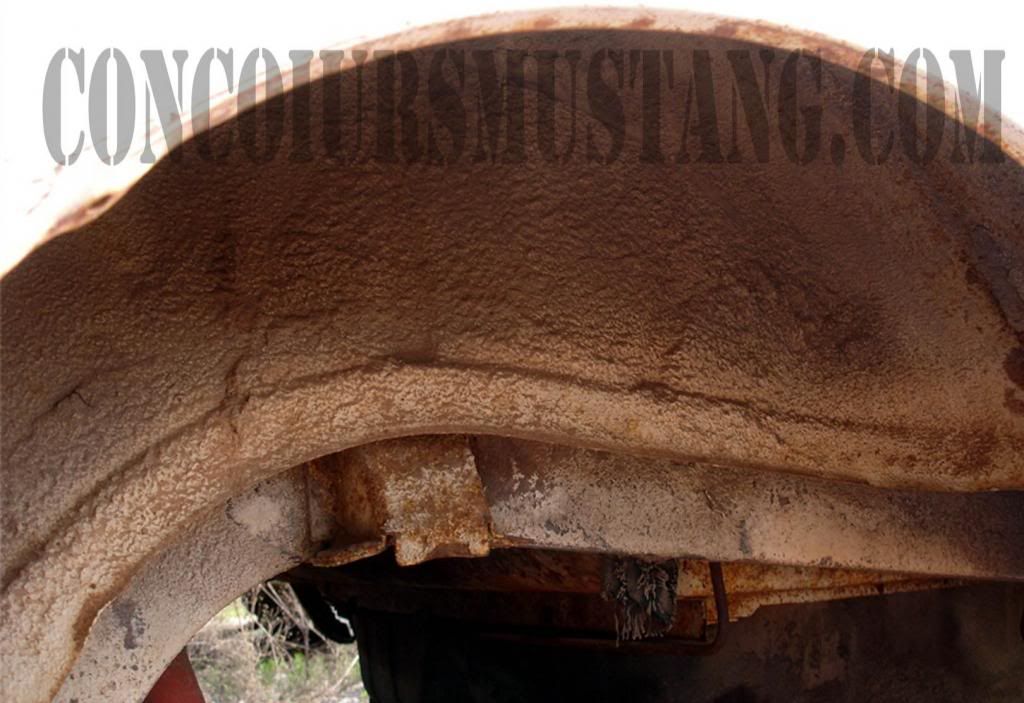
The application of paint to the rear wheelwell area produced a small narrow shadow around the outer edge of the wheel well from the quarter panel lip

An example from your cars time period


Q: But was there an effort to apply a uniform appli
cation of the exterior color paint to the  interior sheet metal that was not masked off, or was this just overspray from the exterior panels?

No attempt was made to keep the rear wheel wells uncoated with exterior color


6. The rocker hem flange was spray painted flat to satin black prior to the front fenders being installed.  There was overspray on to the gloss black underbody.

Nest step would have been the black engine compartment paint applied to the inner surfaces of the engine compartment, firewall visible from within, to the radiator support face and in many cases the inner fender panels forward of the shock towers. This edge was not masked and the amount of paint and the amount of overspray appears to be dependent on the particular painter, possibly their age, effort and height

After or before this stage the pinch weld was blacked out with a semi-gloss black paint applied from the outside inward producing overspray onto surfaces below the car that hung down or were visible from the side of the car as well as the floor panel directly behind the pinch weld. This process started at the front wheel well and normally continued to the rear edge of the quarter panels


7. The engine compartment was masked off and painted semi-gloss black.  Both the interior panels of the engine compartment were painted as well as the outside of the inner fenders. At the firewall, there would be a transition as it went down to the transmission tunnel where the engine compartment black out may not have completely covered the area.


8. After the front fenders were installed and just prior to the wheel/tire assembly being installed, sound deadener was applied to the inner front fenders.  The application would cover the outside of the inner fenders and the inside of the outer fenders.  The spray would also be applied to the suspension components that "got in the way." That is, no effort was made to mask off these components.


Not all the cars got sound deadener applied to the back side of the fender (the tops) though some attempt was made to cover the splash shields where they meet the fenders and such

Appears to have been applied from below the car (like the rear wheelwells. Don't often see allot on suspension but at Dearborn every often see it on the spring covers something different than other plants  in my experience

Do I have this process correct as to application and over spray? The painting will start soon! Thank you, Tom

Looks like it

Remember when painting things off the car (other body panels) the primer will be a different tone and the overspray from the exterior color application on the back side if some lightly (not full coverage or almost full) needs to make sense. Example back side of the where the headlight bucket will attach on a fender would have received a nice coat of paint where the painter painted the lip of the wheel opening. And the back/rear surface of the inside of the fender when the painter shot the rear edge of the fender so that onlu body color showed through when the door was open on the car and the driver or passenger looked forward

Have fun
Jeff Speegle

Anything worth doing is worth doing concours ;)

Offline Building 3

  • Sr. Member
  • ****
  • Posts: 351
Re: December 1965 Dearborn Paint Process
« Reply #2 on: April 26, 2014, 05:28:55 PM »
Jeff, thank you for the detailed reply.  I just have a few clarifications.
1.The underbody spray jets were filled with "batch" paint from the previous day or days painting.  So I guess the gloss level should be glossy, or in other words, the same as the exterior paint, because it was exterior paint. Is that correct?
2. I should use the gloss black as a base and tone it down a bit to make it slightly grayish or perhaps even a blue/green tint? But basically, very dark, but not black.
3. The one thing I do not understand is the following: If the underbody jets were turned on only for the floor pan area (because if they turned on earlier, they would spray up through the engine compartment opening and create a mess; and if they stayed on too long, they would spray up through the trunk opening creating another mess) when did the underside of the engine compartment and the underside of the trunk areas get painted and with what type of paint? I understand that the front and rear of the car were primed by workers with red oxide primer and then later the engine compartment was painted semi-gloss black from the top, and the interior trunk area was coated with a liberal dose of exterior paint from the top, but how about the underside of those areas? When the car came out of the paint shop, how did these areas look?  Was there a step I missed in the process? Also, for a Concours restoration what should be expected in this area? ( I guess it's really the same answer, isn't it?)
4. Just a clarification on the firewall-to-transmission tunnel as seen from the engine compartment: Am I correct that the semi-gloss engine compartment paint phased out near where the firewall starts to transition into becoming the transmission tunnel and that depending on the flexibility and adaptability of the worker, the semi-gloss paint could meet the floor pan batch paint, or there could be a slight gap where we would see some red oxide primer if the worker could not reach far enough down to the tunnel area? Thanks again! Tom
1966 289 C code auto convertible December 1965 scheduled build at Dearborn.

1966 289 C code auto convertible
October 1965 scheduled build at Metuchen.

Offline J_Speegle

  • Administrator
  • Hero Member
  • *****
  • Posts: 24232
Re: December 1965 Dearborn Paint Process
« Reply #3 on: April 26, 2014, 07:41:54 PM »
Jeff, thank you for the detailed reply.  I just have a few clarifications.
1.The underbody spray jets were filled with "batch" paint from the previous day or days painting.  So I guess the gloss level should be glossy, or in other words, the same as the exterior paint, because it was exterior paint. Is that correct?

IMHO normally somewhere between eggshell and fairly glossy - believe they started with a base of epoxy primer sealer and added the old/left over paint to that base


2. I should use the gloss black as a base and tone it down a bit to make it slightly grayish or perhaps even a blue/green tint? But basically, very dark, but not black.

I've been starting out with a base from an early VW dark grey color (sorry don't have the paint code in front of me) and adding left over single stage to it to tint it slightly blue or greenish. If you go dark gray with out a tint that is likely one of the possibilities also

3. The one thing I do not understand is the following: If the underbody jets were turned on only for the floor pan area (because if they turned on earlier, they would spray up through the engine compartment opening and create a mess; and if they stayed on too long, they would spray up through the trunk opening creating another mess) when did the underside of the engine compartment and the underside of the trunk areas get painted and with what type of paint?


Believe that they likely had an insert that was placed over the gas tank opening (likely a board heavy enough not to move when hit with the paint spray) and normally the spray would tail off just before the rear cross member that would have been galvanized


Yes we believe the bottom of the front frame rails, in the pockets of the brackets and braces there as well as the outer inner fender surfaces were painted by hand with a gun. Depending on time period it could be a number of products . At Dearborn in 65 it could be the same color as what was used on the floor or a different color. I would choose the same color to simplify things   

Have a fair number where the batch used on the front frame rails and inner fenders is almost black also so one some cars the contrast (between engine compartment black and that color is minimal. Big visually difference is between that color and the body color in the wheelwells


I understand that the front and rear of the car were primed by workers with red oxide primer and then later the engine compartment was painted semi-gloss black from the top, and the interior trunk area was coated with a liberal dose of exterior paint from the top, but how about the underside of those areas?


Like in the trunk - any of the high or hidden surfaces (example bottom side of the roof or up inside the back of the dash) often received no paint or only light overspray.


When the car came out of the paint shop, how did these areas look?  Was there a step I missed in the process? Also, for a Concours restoration what should be expected in this area? ( I guess it's really the same answer, isn't it?)


Those surfaces would have been fresh steel with think overspray or nothing. After a few weeks or longer (depending on where the car was built, stored and shipped) surface rust would/may develop on the uncovered bare surfaces.  Allot of people prime everything, applying a protectant over the bare steel right after paint while others are painting the hidden areas with "bare steel paint" and lastly others are leaving it to do what may come naturally. Of course these last owners will be storing and protecting the cars more than they ever were originally and that make take some time ;)


4. Just a clarification on the firewall-to-transmission tunnel as seen from the engine compartment: Am I correct that the semi-gloss engine compartment paint phased out near where the firewall starts to transition into becoming the transmission tunnel and that depending on the flexibility and adaptability of the worker, the semi-gloss paint could meet the floor pan batch paint, or there could be a slight gap where we would see some red oxide primer if the worker could not reach far enough down to the tunnel area? Thanks again! Tom

The transition inside the engine compartment to the floor color was very dependent on the individual painter at the time. How young (read flexible or willing to stretch or reach) , how tall or simply how much effort they put forth that day.  Normally the engine compartment black would fade away somewhere in the section between the firewall and the horizontal floor section - that angled lower section of the firewall. Every car was different but on a car with batch color I would not expect to see black, then red oxide , then floor color - just black to floor color on a restored car - its just easier, will not jump out at any judge and will bend in well
Jeff Speegle

Anything worth doing is worth doing concours ;)

Offline Building 3

  • Sr. Member
  • ****
  • Posts: 351
Re: December 1965 Dearborn Paint Process
« Reply #4 on: May 11, 2014, 09:13:38 PM »
Batch Paint: I tried a small experiment to see what I would come up with.  I found the paint installation rates for the 1966 Mustang. On a given day they probably did not paint all of the colors available, but I wanted to see what would happen if this array of colors was the previous day's paint and then used for the "batch" painting the next day.  I then combined families of colors to give me: Blue 19%, Red 16%, Gold/Copper/Bronze 14%, White 13%. I used Testors model paint to mix up a small sample.  The paint turned out very close to what Jeff described as the batch paint used for the underbody:  A dark gray with a blue tint.  The mixture would have been darker and a bit greener if I put in the Ivy Green 8% and Black 4% but I think I am on the right track as a start and in the range of colors that would have been used.  I hope this helps anyone on the hunt for a "batch gray" paint for the underbody if they don't have access to an original car in good condition.  At least its a start for a discussion.
1966 289 C code auto convertible December 1965 scheduled build at Dearborn.

1966 289 C code auto convertible
October 1965 scheduled build at Metuchen.

Offline Building 3

  • Sr. Member
  • ****
  • Posts: 351
Re: December 1965 Dearborn Paint Process
« Reply #5 on: May 12, 2014, 02:01:22 PM »
By the way, I did a little checking, and the color I came up with is very similar to one of the Audi TT colors: Nimbus Gary seems closest and there's also Dolomite Gray and Meteor Gray.  I just throw that out for discussion and trying to be helpful for those like me that need a batch paint color.
1966 289 C code auto convertible December 1965 scheduled build at Dearborn.

1966 289 C code auto convertible
October 1965 scheduled build at Metuchen.

Offline J_Speegle

  • Administrator
  • Hero Member
  • *****
  • Posts: 24232
Re: December 1965 Dearborn Paint Process
« Reply #6 on: May 12, 2014, 08:00:50 PM »
Thanks for sharing your little experiment with the colors - knowing the color pallet it is prewtty easy to predict but hand on doing seems to have come to the same conclusion


By the way, I did a little checking, and the color I came up with is very similar to one of the Audi TT colors: Nimbus Gary seems closest and there's also Dolomite Gray and Meteor Gray.  I just throw that out for discussion and trying to be helpful for those like me that need a batch paint color.

The Audi color sounds like the VW color I've mentioned a few times - a color I've sometimes started with.  Not a surprise since Audi and VW are owned by the same company now I believe  ;)
Jeff Speegle

Anything worth doing is worth doing concours ;)