Author Topic: 1968 San Jose GT 390 Inner Cowl Panel  (Read 2363 times)

Offline bullitt68

  • Hero Member
  • *****
  • Posts: 2142
1968 San Jose GT 390 Inner Cowl Panel
« on: August 07, 2020, 02:42:21 PM »
Just curious how to clean up my Inner Cowl Panel. Obviously it is tricky to get in there. I didn't want to cut it open which seemed to be the only way to get in there.
« Last Edit: August 10, 2020, 02:14:27 PM by bullitt68 »
Mike
1968 Mustang Fastback GT 390 Raven Black, 4 speed
8R02S162374, San Jose, June 5, 1968

Offline J_Speegle

  • Administrator
  • Hero Member
  • *****
  • Posts: 24232
Re: 1968 San Jose GT 390 Inner Cowl Panel
« Reply #1 on: August 07, 2020, 06:43:48 PM »
Are there things in there you want to clean out that won't fit through the factory drain?

Not sure where your car is in its restoration stage but this seems to be the easiest access without additional cutting of a flap or more. 

Used, of course,  in conjunction with access from the drivers side vent and heater holes


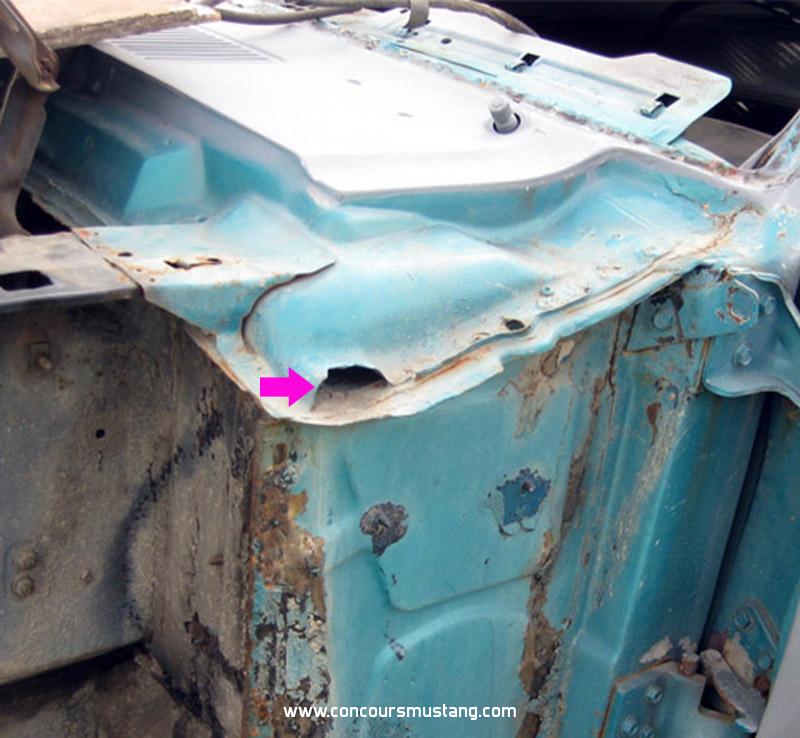
Yes this examples appears to suggest that someone has been here before, doing some reconstruction  ::) but the panels and access do illustrate and access or exit for what ever your looking to flush from the area
« Last Edit: August 07, 2020, 06:46:42 PM by J_Speegle »
Jeff Speegle

Anything worth doing is worth doing concours ;)

Offline bullitt68

  • Hero Member
  • *****
  • Posts: 2142
Re: 1968 San Jose GT 390 Inner Cowl Panel
« Reply #2 on: August 10, 2020, 03:24:48 PM »
Thanks Jeff. I should have mentioned that I was referring to cleaning up the paint. The paint inside the vent was very rough, almost as if the paint was applied on top of dirt at some point. I did manage to fashion a tool, but it has it's limitations and is a tedious task. I was however able to remove all of the old paint with the method. I am hoping to have a smoother application of paint that would resemble factory applications more accurately. If you have any suggestions regarding paint prep or painting inside the cowl it would be greatly appreciated.

Thanks
« Last Edit: August 10, 2020, 03:40:33 PM by bullitt68 »
Mike
1968 Mustang Fastback GT 390 Raven Black, 4 speed
8R02S162374, San Jose, June 5, 1968

Offline cobra5laddict

  • Newbie
  • *
  • Posts: 7
Re: 1968 San Jose GT 390 Inner Cowl Panel
« Reply #3 on: August 15, 2020, 10:43:38 AM »
I just cleaned up the inside of my cowl. The paint inside my cowl looked much like yours. I used a flapper wheel designed to use on a drill. The plastic center holds several pieces of sandpaper and when spinning removes material. I adapted that wheel to some 5/16 all thread inside the cowl. One hand fished the wheel up the fresh air vent, and other head threaded the althread and nut on. Worked well for cleaning up the flats of the cowl but it won’t get into the corners. After clean I poured black chassis pain into the cowl to get coverage. Mine is on a rotisserie so rotating was easy, but you could gain enough calipers with a floor jack under the side... just an idea for you.

Offline bullitt68

  • Hero Member
  • *****
  • Posts: 2142
Re: 1968 San Jose GT 390 Inner Cowl Panel
« Reply #4 on: August 15, 2020, 01:38:22 PM »
I just cleaned up the inside of my cowl. The paint inside my cowl looked much like yours. I used a flapper wheel designed to use on a drill. The plastic center holds several pieces of sandpaper and when spinning removes material. I adapted that wheel to some 5/16 all thread inside the cowl. One hand fished the wheel up the fresh air vent, and other head threaded the althread and nut on. Worked well for cleaning up the flats of the cowl but it won’t get into the corners. After clean I poured black chassis pain into the cowl to get coverage. Mine is on a rotisserie so rotating was easy, but you could gain enough calipers with a floor jack under the side... just an idea for you.

Thanks. Do you have any photos. Not sure how you got it inside
Mike
1968 Mustang Fastback GT 390 Raven Black, 4 speed
8R02S162374, San Jose, June 5, 1968

Offline cobra5laddict

  • Newbie
  • *
  • Posts: 7
Re: 1968 San Jose GT 390 Inner Cowl Panel
« Reply #5 on: September 04, 2020, 10:58:35 AM »
My heater and fresh air vents are removed.  I used 2 sections of all thread I coupled together with a tube nut or something similar to thread them together. The yellow flapper wheel has a removable shank to use in a drill. I unbolted that and attached the wheel to the first section of all thread with come jamb nuts. From inside the car, poke the end of the all thread over the top of the cowl hat and out the drain hole. The flapper wheel was just small enough to fit over the top hat to get inside the cowl. After that I joined the second section of the all thread with a tube nut (just a thick nut about .75-1” thick) and connected it to my electric drill. Clean away and switch sides as necessary to access both sides. Mind you it was pretty difficult and I’m sure I didn’t get the area too well Between the hat and the drain. You could always cut the end of the cowl open to get that but my cowl was solid.

Offline cobra5laddict

  • Newbie
  • *
  • Posts: 7
Re: 1968 San Jose GT 390 Inner Cowl Panel
« Reply #6 on: September 04, 2020, 10:59:49 AM »
68’ may have a slightly different cowl? I did this on a 66’

Offline Bossbill

  • Hero Member
  • *****
  • Posts: 3249
  • In the middle of project hell
Re: 1968 San Jose GT 390 Inner Cowl Panel
« Reply #7 on: September 04, 2020, 12:20:31 PM »
bullitt68 and I discussed this a bit offline. He wanted the area underneath the grill to look better.

In the first pic it shows a 3M abrasive daisy wheel. There's a real name for these ...
The center of the abrasive wheel has a metal stamped 1/4x20 nut. I use real bolts with the head cut off as they are much stronger than all thread. And the smooth shaft fits better into 90* air grinders. Here it shows the threaded bolt going all the way through the wheel. I normally just cut off all the threads except for the last 1/8 or so. Or use solid rod and thread just a small portion of the end.

The wheel just passes through the grill slit. When it lands just thread the long stud into it. To flip it over or remove it from the grill slit use a thin 90* pick.

If you have the right length on the stud/rod you can reach more real estate than you think as the wheel works best at angles.

I use air grinders with adjustable inlet restriction to keep max speed down. Dremels are way too fast for this as are air grinders at full tilt. Showing an Onyx air grinder, one of my favorite, affordable air tool brands with a metal finish disc on it. I just replaced a CH cutoff wheel tool with a new Onyx and this things just kicks booty.

 
« Last Edit: September 04, 2020, 12:26:01 PM by Bossbill »
Bill
Concours  Actual Ford Build 3/2/67 GT350 01375
Driven      6/6/70 0T02G160xxx Boss 302
Modified   5/18/65 5F09A728xxx 347 Terminator-X 8-Stack
Race        65 2+2 Coupe conversion