Author Topic: Trunk Painting Sequence  (Read 4254 times)

Offline Bossbill

  • Hero Member
  • *****
  • Posts: 3250
  • In the middle of project hell
Re: Trunk Painting Sequence
« Reply #15 on: July 03, 2019, 10:50:24 PM »
Had a good time at the MCA meet. Met a few people from here! The heat index made it over 100*.

I've gone and back and forth on this topic for the last week and tried approaching this from another angle. The patterns Jeff showed are a bit random -- some suggesting up, some suggesting down and others are just a mystery.

So I went back to what would you do as assembly line work chief and/or worker? What works and what is fast? And, given that these cars are going to be shipped, how do you lower the hinges after painting? Un-tensioning the rod invites window/trunk filler damage.

Simple is best. So I flipped the torsion rod around so that it would not hit the window filler piece regardless of position. We want the rod in this position later for shipping anyway. When its flipped into the correct position at SA it doesn't appear to change any paint (or lack of paint) marks.


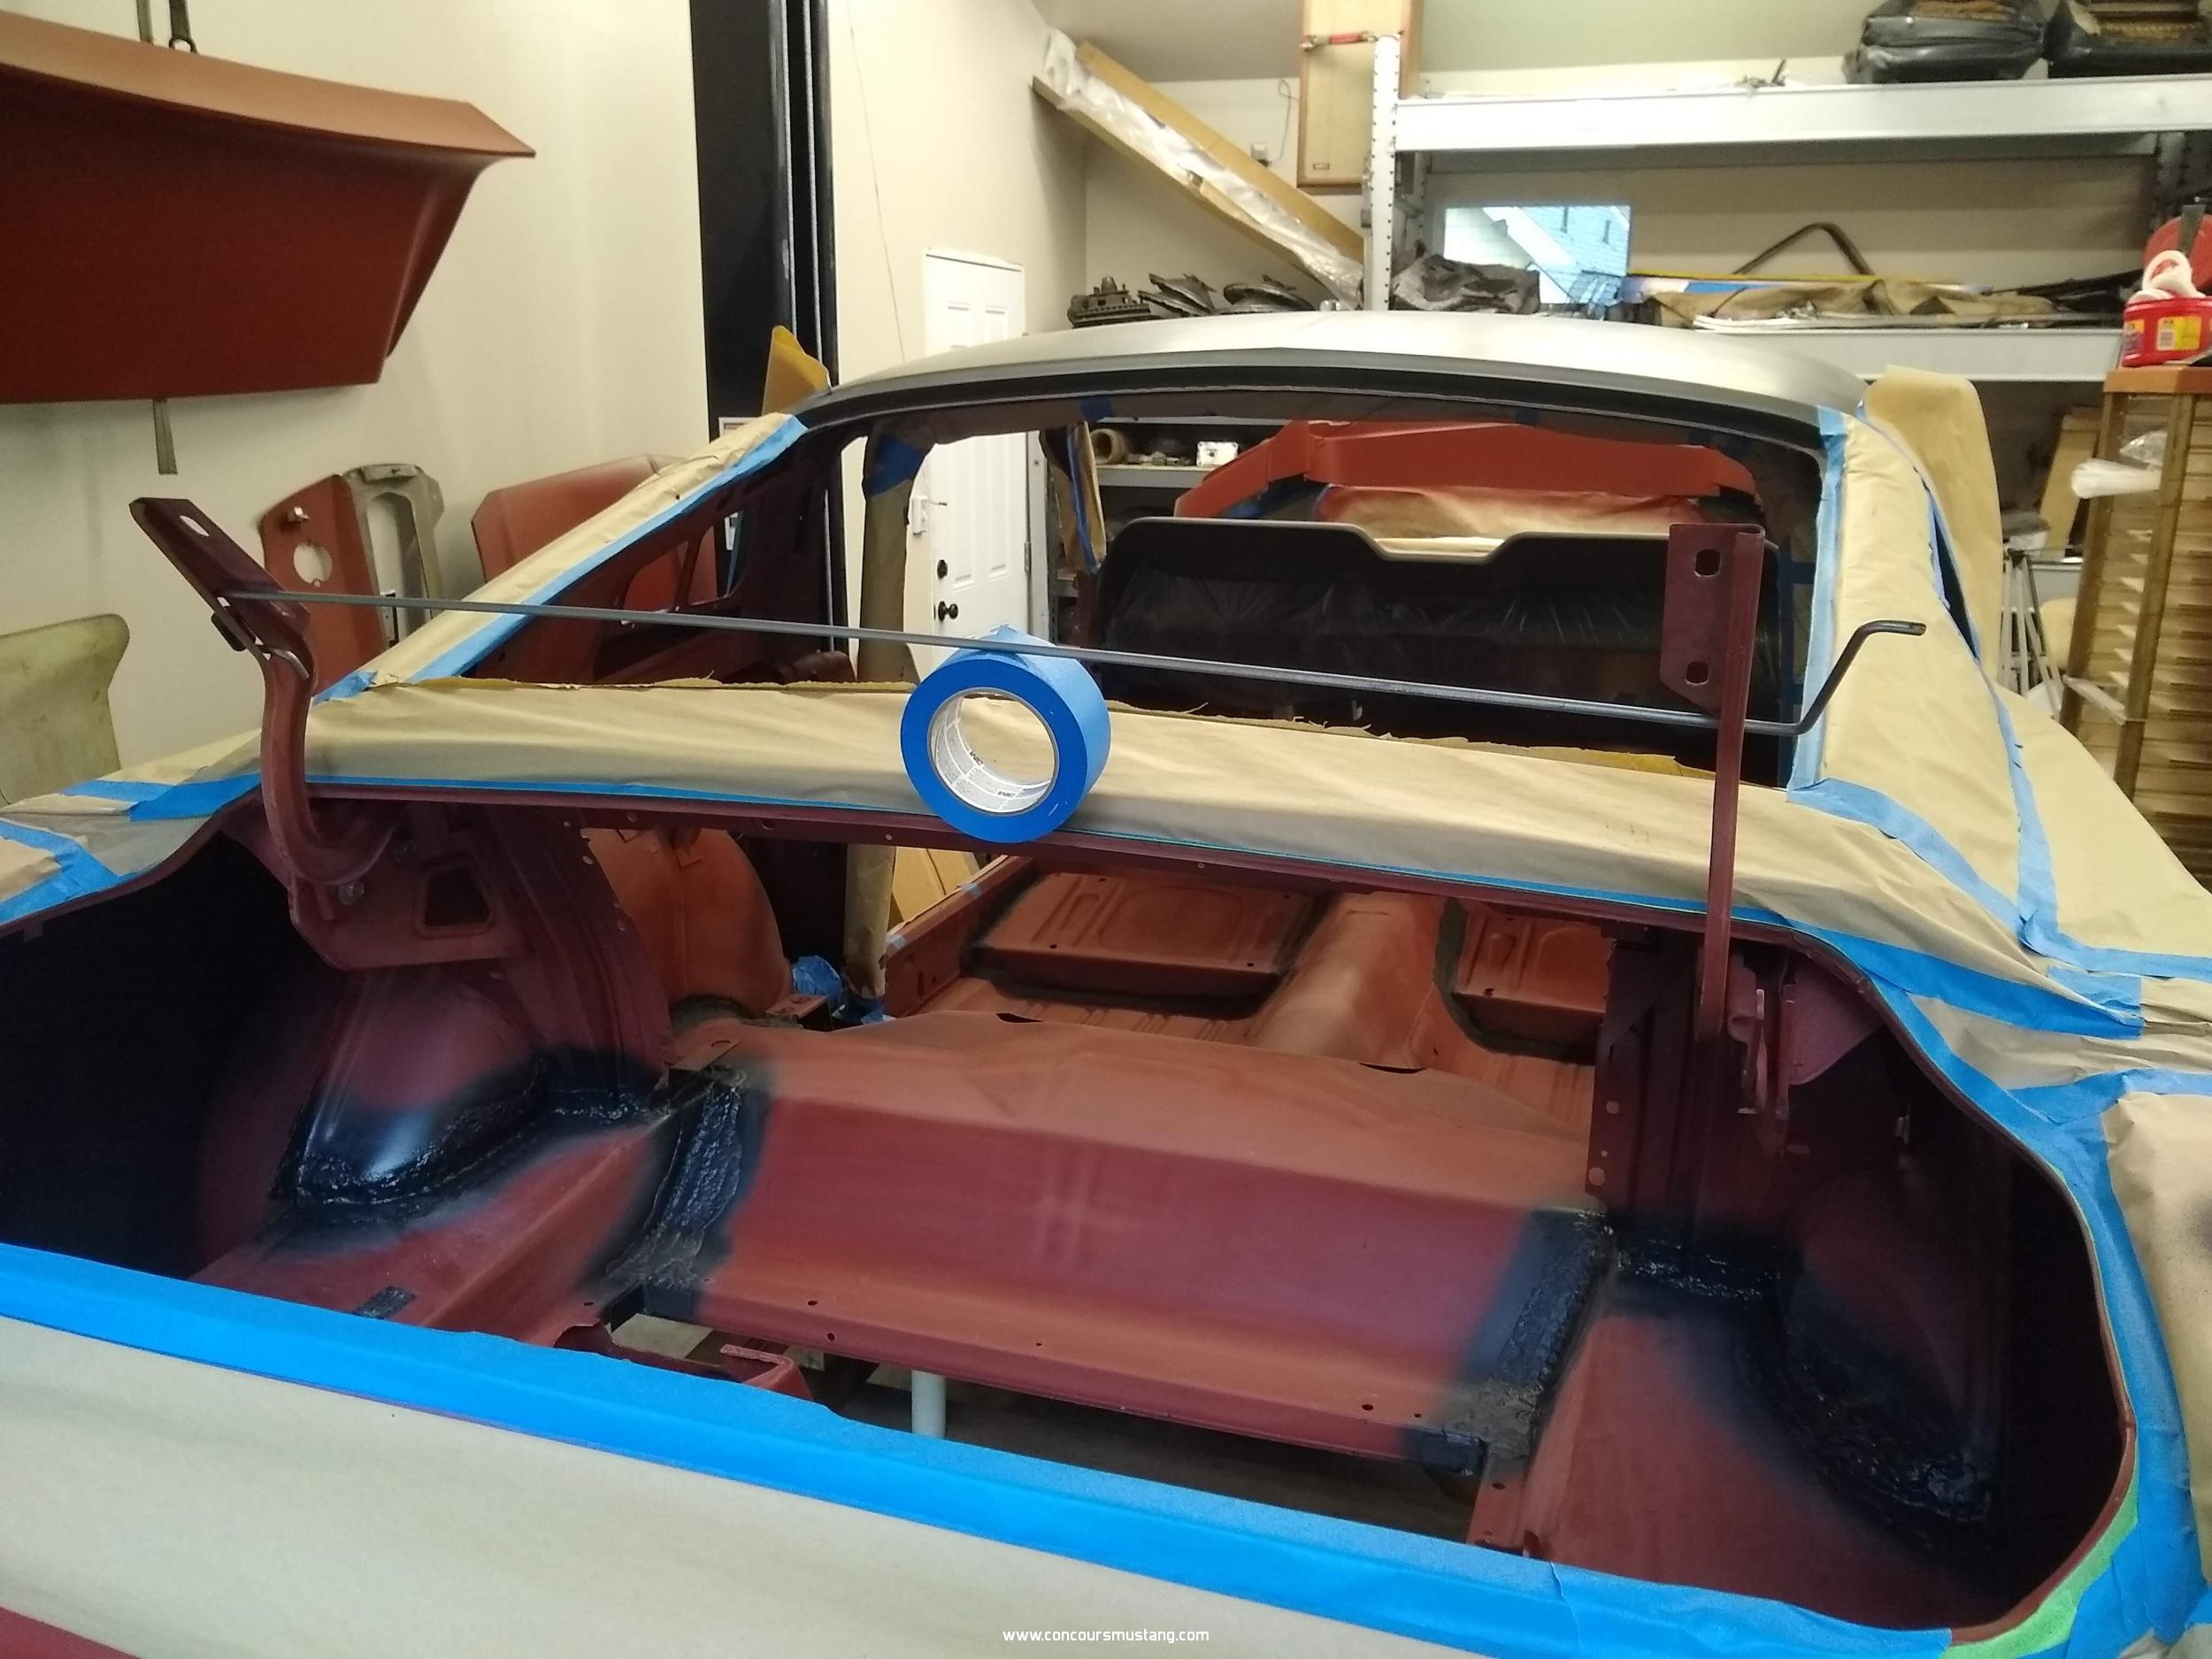
Place an undefined tool into the gutter -- here I used a roll of tape. The height of the tool determines how high the hinges go. The factory could use a metal rod of some type. Now, paint the inside of the trunk and the hinges. The light coat on the underside might be a particular painter who wanted less over-spray on the body since the paint would move up and forward.


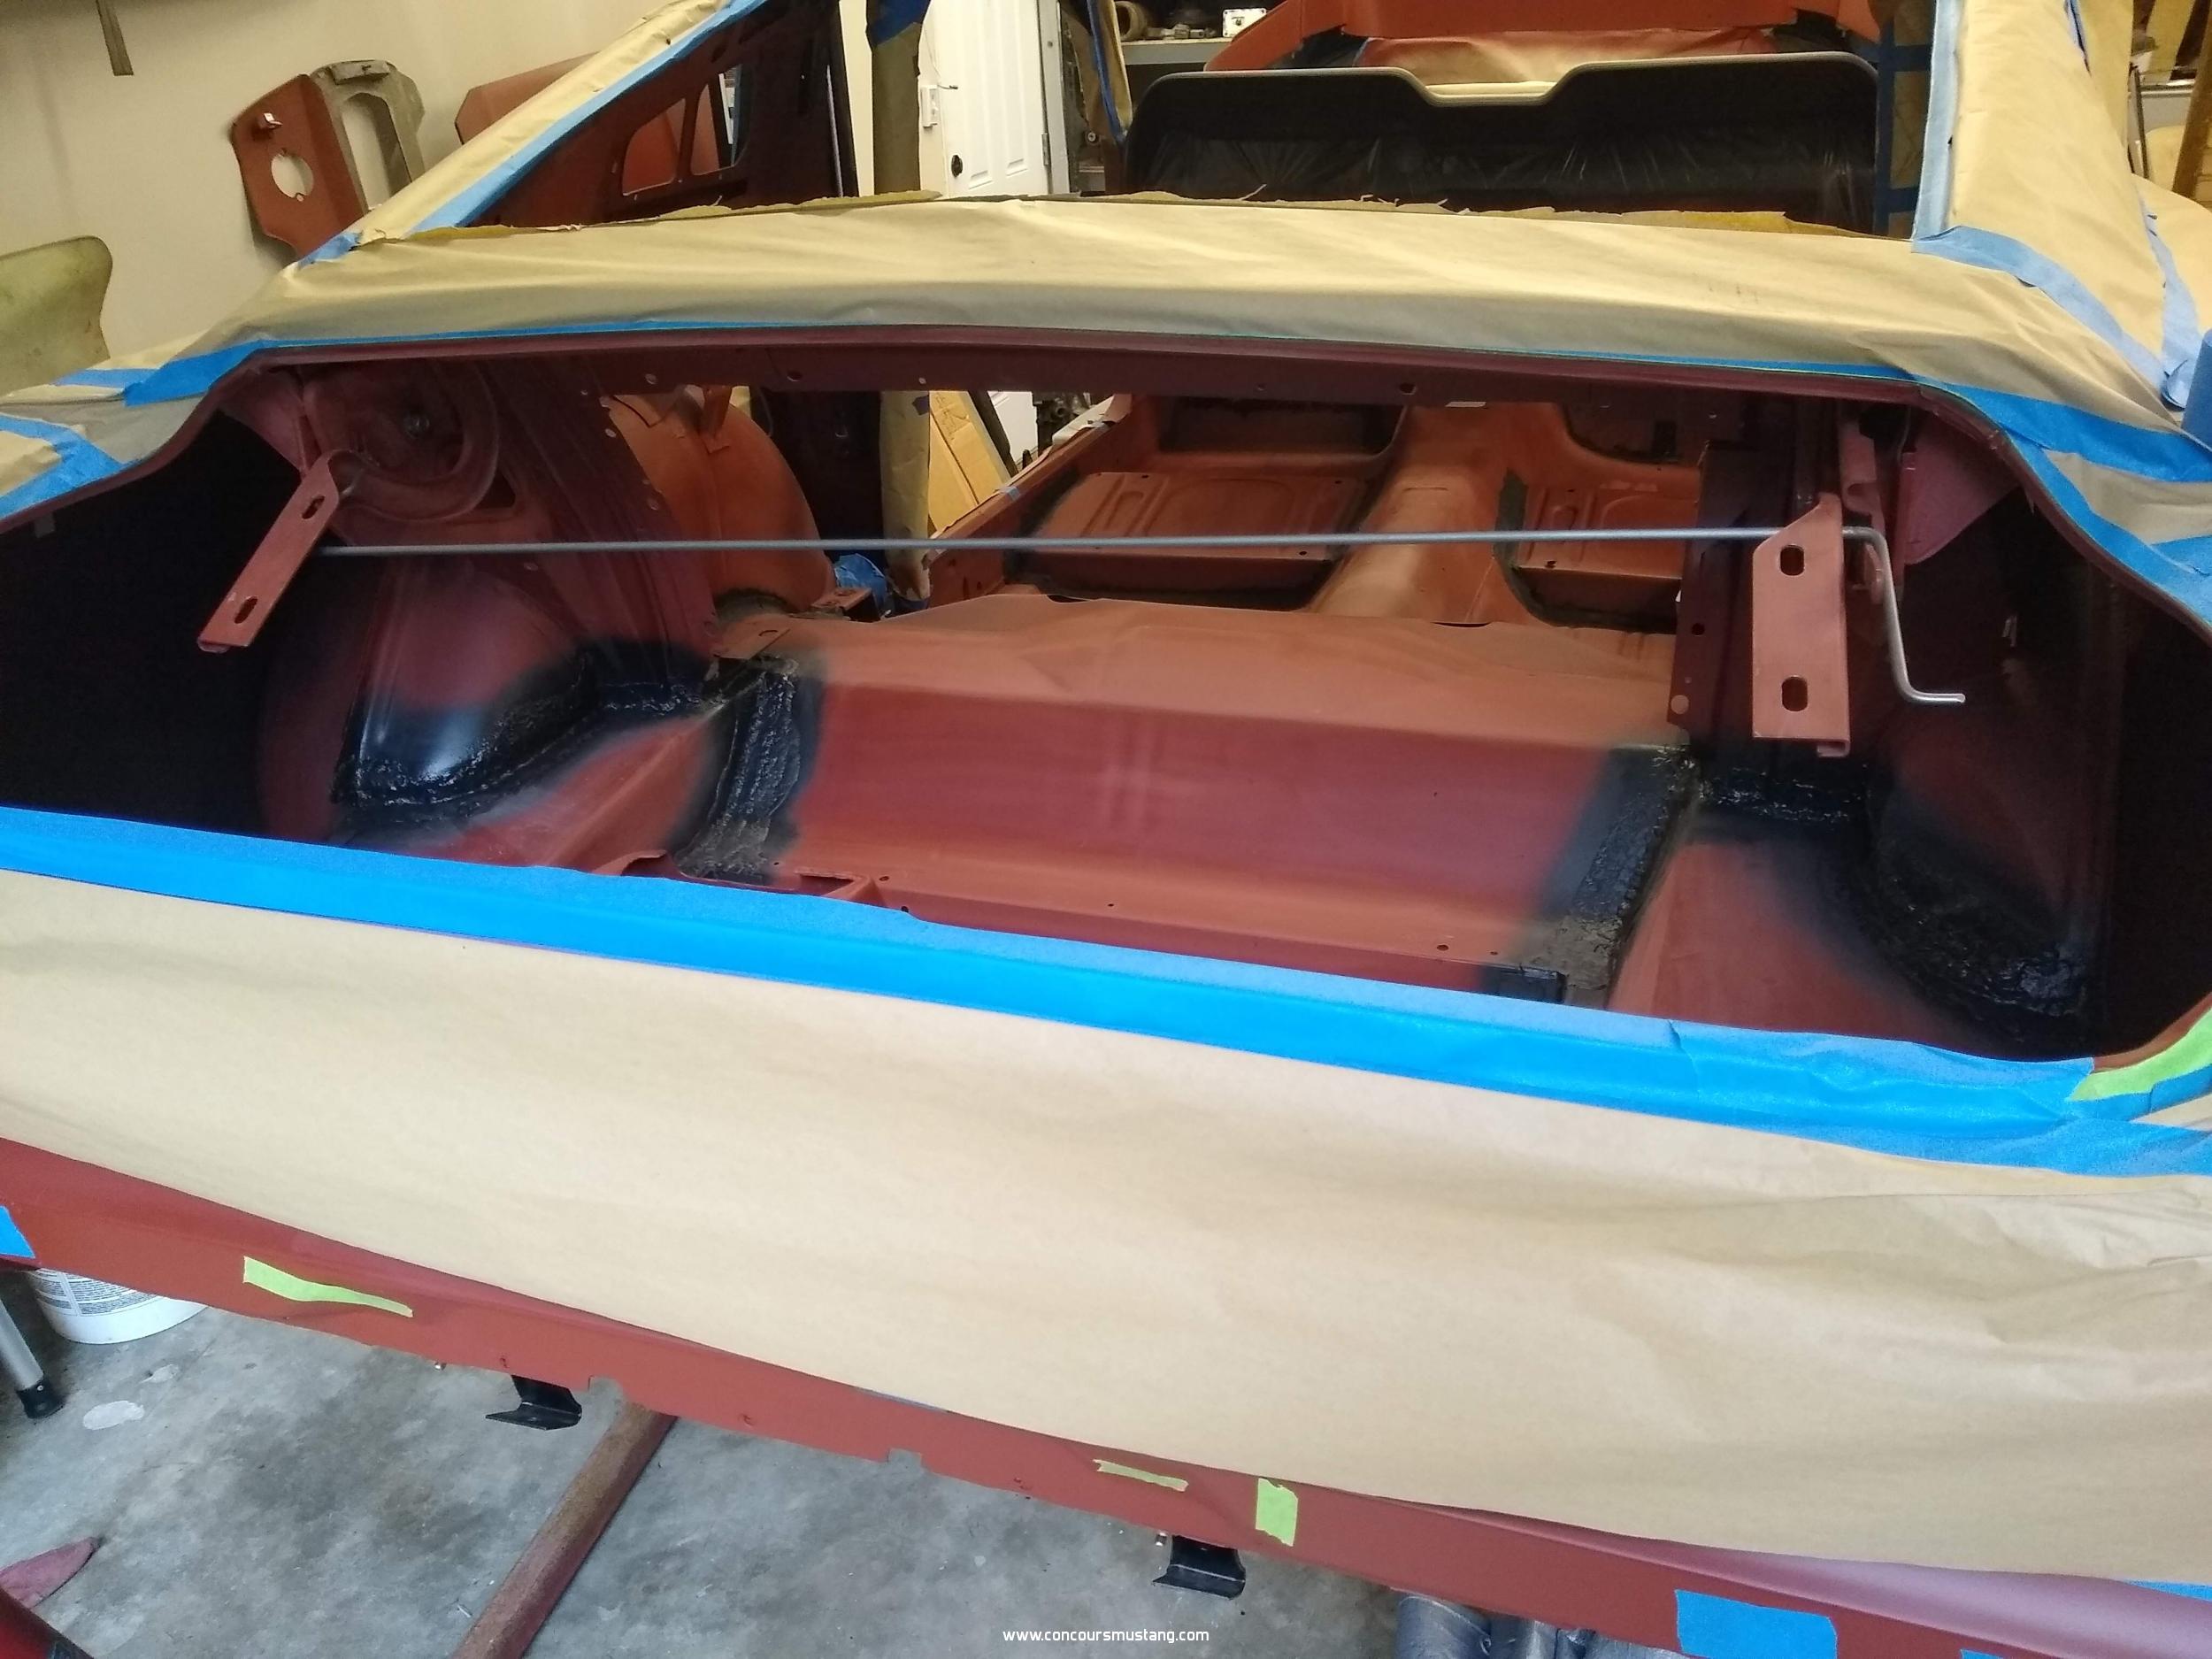
When the inside is complete remove the tool and let hinges and rod move into the trunk.
As the painter moves to the body the top of the hinges gets painted by overspray as he paints the gutter and filler as well as the area where the tool sat. He can also get to some of the hinge curved section. Note that having the hinge up and then down coats all sides of the rod.

The second pic here looks a bit like the factory lot pic, including the angle. One other thing to consider is that new hinges could be fairly tight and with nothing on them other than the rod, they might just stay in almost any position.
Bill
Concours  Actual Ford Build 3/2/67 GT350 01375
Driven      6/6/70 0T02G160xxx Boss 302
Modified   5/18/65 5F09A728xxx 347 Terminator-X 8-Stack
Race        65 2+2 Coupe conversion

Offline J_Speegle

  • Administrator
  • Hero Member
  • *****
  • Posts: 24247
Re: Trunk Painting Sequence
« Reply #16 on: July 04, 2019, 02:06:12 AM »
In the lower picture if it will be painted that way what do you plan on doing with the retaining clip and the end of the trunk spring?  Install later and touch each up to look as if they were in place when painted?


On the MCA meet - yes many are very hot either temp or the total heat index especially considering many/most are out doors on asphalt. My record has been 115 degrees in temp. Wasn't pretty
Jeff Speegle

Anything worth doing is worth doing concours ;)

Offline Bossbill

  • Hero Member
  • *****
  • Posts: 3250
  • In the middle of project hell
Re: Trunk Painting Sequence
« Reply #17 on: July 04, 2019, 02:20:59 PM »
In the lower picture if it will be painted that way what do you plan on doing with the retaining clip and the end of the trunk spring?  Install later and touch each up to look as if they were in place when painted?


On the MCA meet - yes many are very hot either temp or the total heat index especially considering many/most are out doors on asphalt. My record has been 115 degrees in temp. Wasn't pretty

Good point on the trunk spring end. I'll be sure to get it when the hinges are up. I'll also hit the tootsie roll and maybe put the clip on the end of my "tool" to coat it.


I am aware that by flipping the rod end the driver's side "end of rod" could create an incorrect shadow. But there is enough slack in the rod side-to-side to get paint in there. This pic is meant to illustrate how much room there is behind the end-of-rod, nothing more.


I'm not sure how this paint nick got here (directly under rod), but if the rod is installed as per my picture it could cause this if the end-of-rod is too close to the hinge during painting.


Interesting aside is that the body side of my hinges show the use of fender style disc bolts and not the star-tooth washer style found here.


Here is a pic from my SJ Coupe parts car, which was built the same week as my car with the fender-style disc washer. It could be that the star-tooth washers were out of stock that week or simply a strange coincidence.
Bill
Concours  Actual Ford Build 3/2/67 GT350 01375
Driven      6/6/70 0T02G160xxx Boss 302
Modified   5/18/65 5F09A728xxx 347 Terminator-X 8-Stack
Race        65 2+2 Coupe conversion

Offline J_Speegle

  • Administrator
  • Hero Member
  • *****
  • Posts: 24247
Re: Trunk Painting Sequence
« Reply #18 on: July 04, 2019, 04:57:35 PM »

Here is a pic from my SJ Coupe parts car, which was built the same week as my car with the fender-style disc washer. It could be that the star-tooth washers were out of stock that week or simply a strange coincidence.

Looking at the whole production year it appears from original unrestored cars that both style of bolts (toothed and flat/wave washer) were used through the production year so it appears that it depends on the production period. Sure there were some cars built during the change overs where there was a mix but haven't foudn any examples yet.   Can document another 6 or so examples from the same production period as your car or from a narrow VIN range from San Jose if your choosing to restore the car as you found it rather than correct the mistake and build it as Ford/San Jose planned without the mistake.

Can provide you with the supporting documentation if you choose to keep them and are building a binder so that you have the supporting documentation you will need if showing the car. But don' think it belongs in this thread  and steering us away from the current focus ;)


Edited/corrected first sentence to better reflect review of pictures
« Last Edit: July 06, 2019, 03:59:52 PM by J_Speegle »
Jeff Speegle

Anything worth doing is worth doing concours ;)

Offline J_Speegle

  • Administrator
  • Hero Member
  • *****
  • Posts: 24247
Re: Trunk Painting Sequence
« Reply #19 on: November 19, 2019, 08:09:13 PM »
Responded to a request on the SAAC site for some pictures of trunk overspray examples. Since I posted the pictures there I thought I would add them to this thread to help others here on this site. Choose white cars since the contrast is much greater. On darker cars the paint would possibly be similar just not as easy to see

Hope this helps others


Different angle from one of the cars shown above
Jeff Speegle

Anything worth doing is worth doing concours ;)

Offline Bossbill

  • Hero Member
  • *****
  • Posts: 3250
  • In the middle of project hell
Re: Trunk Painting Sequence
« Reply #20 on: November 19, 2019, 10:45:12 PM »
Oh, the humanity! Overspray on the Plaza sticker (for which I paid too much)!

Three questions.
* It looks like the trunk catch was on there when painted. That seems odd. Really?
* SA when assembling the trunk would have used their stash of bolts with bolt-in washers. One of those bolts on the hinge looks like a 65/66 toothed captive washer. Ummm?
* The bolts holding the catch to the lid look like garden variety hardware store bolts.
Since SA already had bolts with captive washers for the hinge, why these?

But thanks for the pics. My painter will laugh in my face when I ask him to replicate this (and paint over my sticker). He's pretty anal about his paint jobs. Then again, he laughs at me a lot anyway.
Bill
Concours  Actual Ford Build 3/2/67 GT350 01375
Driven      6/6/70 0T02G160xxx Boss 302
Modified   5/18/65 5F09A728xxx 347 Terminator-X 8-Stack
Race        65 2+2 Coupe conversion

Offline jwc66k

  • Hero Member
  • *****
  • Posts: 7149
Re: Trunk Painting Sequence
« Reply #21 on: November 20, 2019, 12:16:10 AM »
* SA when assembling the trunk would have used their stash of bolts with bolt-in washers. One of those bolts on the hinge looks like a 65/66 toothed captive washer. Ummm?
* The bolts holding the catch to the lid look like garden variety hardware store bolts.
Since SA already had bolts with captive washers for the hinge, why these?
Shelby was not building "concourse grade cars". The used hardware that worked. This info is from someone that watched a few being made. If they needed hardware, is was purchased at local hardware stores. Another observation was the piles of exhaust and intake manifolds. I wonder what happened to the stripped parts.
Jim
I promise to be politically correct in all my posts to keep the BBBB from vociferating.

Offline Bob Gaines

  • Global Moderator
  • Hero Member
  • ****
  • Posts: 9023
Re: Trunk Painting Sequence
« Reply #22 on: November 20, 2019, 12:18:12 AM »
The Plaza fiberglass stickers didn't always stay put when stuck to the fiberglass so if missing there is typically a witness line in the shape of the missing sticker. No harm no foul in concours because that was "just the way it was" (quote Ed Meyer) . Also the stickers were on the trunk lids of course when they arrived at SA so the bottom side of the trunk and hood were apparently already blacked out when delivered to SA.Some were not blacked out and were bare fiberglass. Yes if you have a body color overspray pattern on the bottom side as it would be from the factory and the sticker is in the line of fire but somehow doesn't have overspray on it then it is grounds for a small deduction in concours judging given it wouldn't make practical sense. There were a varying range of spray patterns from one trunk lid or hood to another.   
Bob Gaines,Shelby enthusiast, Shelby collector , Shelby concours judge SAAC,MCA,Mid America Shelby

Offline Bob Gaines

  • Global Moderator
  • Hero Member
  • ****
  • Posts: 9023
Re: Trunk Painting Sequence
« Reply #23 on: November 20, 2019, 12:28:59 AM »
Shelby was not building "concourse grade cars". The used hardware that worked. This info is from someone that watched a few being made. If they needed hardware, is was purchased at local hardware stores. Another observation was the piles of exhaust and intake manifolds. I wonder what happened to the stripped parts.
Jim
Not always but typically they had Ford type fashioners to build the cars . That was one of Chuck Cantwells jobs to make sure they had adequate supplies and didn't run out so he has said in interviews . With that said there are some places on the cars that typically had hardware store type fashioners . The hardware store zinc nuts with no lock washer on the leaf spring anti wind up snubber attaching bolts seen from underneath the car comes to mind. In the early days before SA had Ford take off certain parts the piles were advertised in Automotive magazines and the like for sale locally and mail order. I understand later on they sold things like exhaust manifolds as scrap.
Bob Gaines,Shelby enthusiast, Shelby collector , Shelby concours judge SAAC,MCA,Mid America Shelby