Author Topic: Some late 69 NJ undercarriage detail questions  (Read 4805 times)

Offline 187813

  • Newbie
  • *
  • Posts: 5
Some late 69 NJ undercarriage detail questions
« on: September 05, 2012, 05:52:04 PM »
Hi everyone, just want to say there is a wealth of information here and it's a great help. Back in the 80's we had to go to shows, look at cars, bother owners, take pictures (and get them 'developed'), and rely on the available info at the time. Now with sites like this, it almost feels like cheating....  That being said, I have a few questions that I hope some of you can help answer. The car in question is 9T02R2004XX- a '69 Mach 1 428CJ AT, Candyapple Red with a black interior. I'm trying to move to the next step and my questions are:

1. Since it's a Mach 1 there is extra sound deadener on the transmission tunnel. I believe Jeff mentioned there were three passes with the gun. Was the shifter installed before S/D? Was the main brake line and clips installed before S/D? Was it just a coat of Body Schutz or a heavy build like inside the quarter panels and wheel houses ( replicated w/Spectrum Sludge and topcoated w/Body Schutz)?

2. I know the floor to rocker is sealed after primer, body color, and blackout. Is it just that seam and around the corner at the rear torque box or does the sealer follow the rear frame rail? Does anyone have a picture or a diagram to show the sealer layout? I remember seeing one on this forum but not sure if it was applicable to this car.

3. Is there any sealer or sound deadener applied near the front torque boxes and floor to firewall seam? Again- any pics or diagrams would be appreciated.

The car is looking good and I'd rather not make any bone-head moves right now. Thanks for your help.
« Last Edit: September 08, 2012, 05:43:50 PM by J_Speegle »

Offline J_Speegle

  • Administrator
  • Hero Member
  • *****
  • Posts: 24232
Re: Some undercarriage detail questions
« Reply #1 on: September 05, 2012, 11:35:57 PM »
...... The car in question is 9T02R2004XX- a '69 Mach 1 428CJ AT, Candyapple Red with a black interior. I'm trying to move to the next step and my questions are:

First have to offer that NJ details are often difficult to find since they are often held up worst that cars from the other plants due to local conditions. Every once in a while we find an original that escaped early in life but its just that the ratio between good solid original and bodies with little left to examine and documents is much poorer.

Have one available currently locally that I've not yet been able to get up on a rack for  clear nice undercarriage pictures but will make a special trip in the next two days to try and get some- its getting ready to return to its home :(  Its in the #186xxx range just before yours and as luck would have it - have some from a #210xxx period also I'll dig out. So we should get a fairly decent idea of what may have been going on when your car was being built

1. Since it's a Mach 1 there is extra sound deadener on the transmission tunnel. I believe Jeff mentioned there were three passes with the gun. Was the shifter installed before S/D? Was the main brake line and clips installed before S/D? Was it just a coat of Body Schutz or a heavy build like inside the quarter panels and wheel houses ( replicated w/Spectrum Sludge and topcoated w/Body Schutz)?

The Mach I Grande floor sound deadener appears to have been applied after the transmission was installed so it normally does not come (close to shifter) that far forward in the tunnel. Though often this surface can collect allot of grease and dirt over the years taking on the appearance of spray sound deadener IMHO. All of the fuel lines and brake lines were fully installed and like the E brake cables would have gotten a coating if the material was applied in that area. Since it was a single pass with the wand the angle of application would have left a shadow of uncoated area (though small and thin) somewhere if your getting detailed 

2. I know the floor to rocker is sealed after primer, body color, and blackout. Is it just that seam and around the corner at the rear torque box or does the sealer follow the rear frame rail? Does anyone have a picture or a diagram to show the sealer layout? I remember seeing one on this forum but not sure if it was applicable to this car.

Will check - don't believe we've done much publusting of 69 NJ details because of the challenge mentioned above


3. Is there any sealer or sound deadener applied near the front torque boxes and floor to firewall seam? Again- any pics or diagrams would be appreciated.


There will be some at the top of the torque box in the front wheel well - none at the rear where it connects to the floor section. Have diagrams for the other two plants (that are yet not been published) but have not had enough good sources to cover the NJ ones as of yet.
Jeff Speegle

Anything worth doing is worth doing concours ;)

Offline 187813

  • Newbie
  • *
  • Posts: 5
Re: Some undercarriage detail questions
« Reply #2 on: September 07, 2012, 10:15:19 AM »
Thanks Jeff.

Offline J_Speegle

  • Administrator
  • Hero Member
  • *****
  • Posts: 24232
Re: Some undercarriage detail questions
« Reply #3 on: September 07, 2012, 08:31:37 PM »
Did get a pretty good look at the late 69 NJ Mach the other day - on the ground. Got through one side of the undercarriage before the camera battery died. Will put together a response and post it. Just want you  to know we're  on the job ;)
Jeff Speegle

Anything worth doing is worth doing concours ;)

Offline drummingrocks

  • Hero Member
  • *****
  • Posts: 1291
Re: Some undercarriage detail questions
« Reply #4 on: September 08, 2012, 05:23:02 PM »
Did get a pretty good look at the late 69 NJ Mach the other day - on the ground. Got through one side of the undercarriage before the camera battery died. Will put together a response and post it. Just want you  to know we're  on the job ;)

Jeff, if you include the info in a new post, could you include a link here to it?  I'd like to see what gets posted, as I've got a June 1969 NJ Mach 1.
Too much junk, too little time.

Offline J_Speegle

  • Administrator
  • Hero Member
  • *****
  • Posts: 24232
Re: Some undercarriage detail questions
« Reply #5 on: September 08, 2012, 05:42:25 PM »
Jeff, if you include the info in a new post, could you include a link here to it?  I'd like to see what gets posted, as I've got a June 1969 NJ Mach 1.

Will post the stuff there

187813 - are you in need of this info in a hurry? Would like to have something nice to show you clearly what I've been seeing - but if your in a rush we can forget (for the moment) making it all pretty ;)
Jeff Speegle

Anything worth doing is worth doing concours ;)

Offline 187813

  • Newbie
  • *
  • Posts: 5
Re: Some late 69 NJ undercarriage detail questions
« Reply #6 on: September 09, 2012, 11:07:59 AM »
Thanks Jeff. The body is still on the rotator and I just want to take care of as much as possible before returning to 'wheels on the ground'. I have gotten a bit spoiled ( not to mention older and less flexible) using the rotator. I will be able to put it on a conventional lift after paint to finish the undercarriage detailing but I just wanted to keep the order of procedures close to original assembly. Any help and info will be appreciated- waiting a little bit is no problem. This resto had been started before I got involved so some original details were lost.
Thanks again,
 Walt

Offline J_Speegle

  • Administrator
  • Hero Member
  • *****
  • Posts: 24232
Re: Some late 69 NJ undercarriage detail questions
« Reply #7 on: September 09, 2012, 08:31:35 PM »
Ok Walt we have some help for you. A few things first - since (like allot of people) you didn't have allot original details to start with

1- In general your front wheelwells will have seam sealant, then be completely blacked out (before any parts were installed) like 69 San Jose cars were)

2- Floor color was a version of red oxide epoxy primer - a smooth fairly glossy finish. With the typical body color and pinch weld overspray. Front frame rail color (on bottom surface) can be a little different in tone since it was applied at a different point - from a different tank or drum

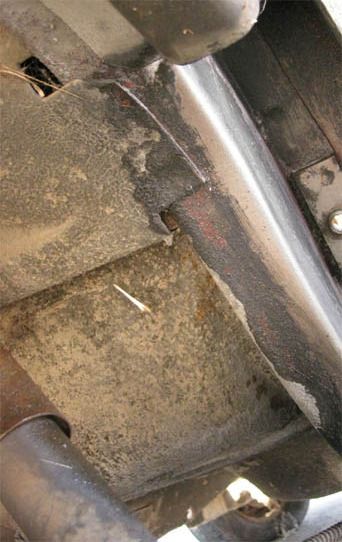
3- It appears that the rear wheelwells were coated with sound deadener like the other two plans that year - and then overcoated with body color as the painter passed over the wheel opening (putting a really nice coat of paint on the back surfaces - include exposed frame rail)  and around the wheel lip

4- Rear valance was on the car at the time it was painted (added after the grey primer coat)

5- Rocker to floor seams were sealed like the other two plants. At the rear the bead of sealant (wiped down with a rag or brush) along the forward edge of the leaf spring support panel to floor seam)

Now to the Mach I/Grande sound deadener applied to the floor. Would like to take this opportunity to thank you for your request - I'm afraid that without it I would have not taken the opportunity to spend some additional time with at least one of these cars.

Observations:

- It appears again the the guys liked to stand near the center of the vehicle and spray slightly outward. In the pictures you can see the shadow the front frame rail produced on the front outer floor surface

- Hard to tell what was in place at the time of spraying. Appears IMHO that like the other plants that the trans was in place as were the brake lines but I didn't find sound deadener on the E brake cable nor a shadow in the product applied to the floor. Hard to tell if the seat pan plugs were in place (like the other plants) since the sound deadener does not still well and if the seats are ever removed it falls off quickly

- As usual the sound deadener is kept from the floor near the rocker panel (unlike typical undercoating applications) since a slight hick-up might mean the sound deadener would get sprayed on the exterior body or somewhere else in the shop = allot of clean up :(

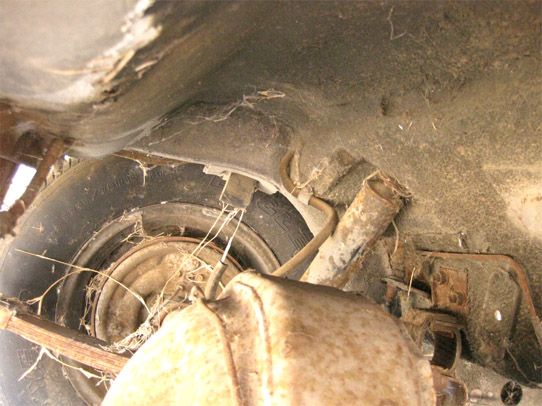
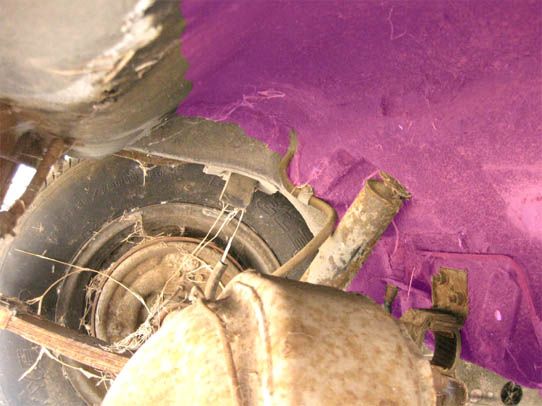
- Unlike the other plants (well at least all the cars I've found so far)  the sound deadener did not stop at the floor surface below the rear seat but continued (at least on these two examples from the same time period as your car)  to up over the rear end area and fades away on the front surface of the gas tank drop panel. This application is kept (well they tried) the rear frame rails

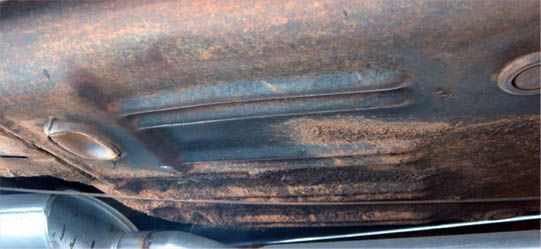
- Like the other plants the application in the drive line tunnel begins at or near the back end of the trans (picture shows about 1" behind the shifter support)  and is a very heavy application.

Here's the supporting pictures - hope this helps (Sorry the camera only let me capture the passenger side of the one car - other side was pretty much the same). Applied a highlighted layer in some pictures to show the area covered by the product


Driveline tunnel behind shifter support


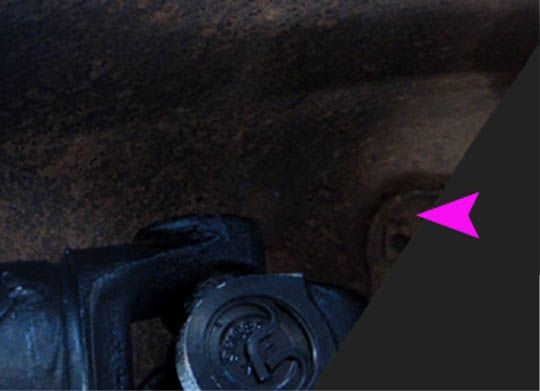
Arrow indicates the rear edge of the shifter support - shows a fairly straight line of application with that pass


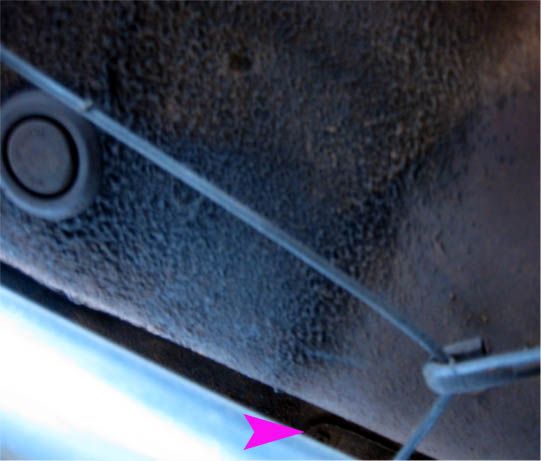
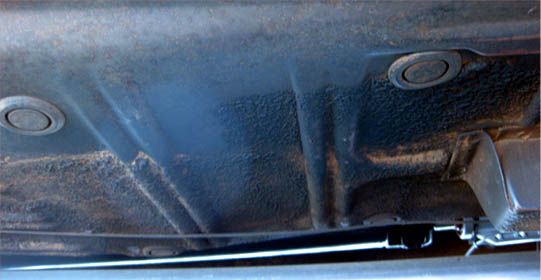
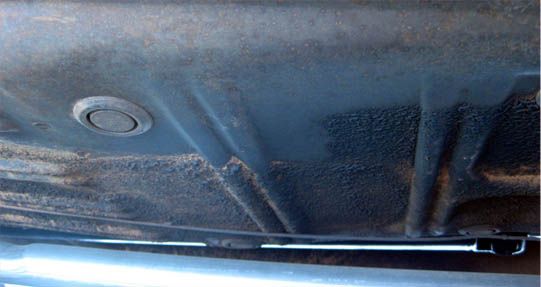
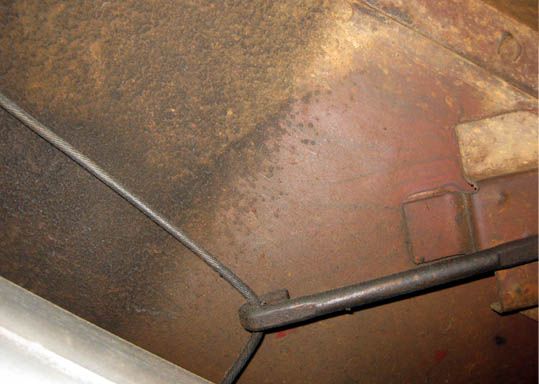
Floor shots - should flow from front to rear of vehicle if I do this right :) Looks like on this side the guy pulled the trigger a little early  hitting part of the bottom of the front frame rail (only about 5" of the bottom surface) getting some on the torque box. Notice that the outer surface of the frame rail (and about 2-3" of the floor) has not product on it. Just red oxide, body and pinch weld overspray as well as dirt ) This two outer passes (one on each side) are forward of the driveline pass but didn't include the inner floor (inside the frame rail) as shown in the other pictures. Looks like they move rearward to under the front seat where they blend with another pass that the worker started and continued rearward as he must have move also


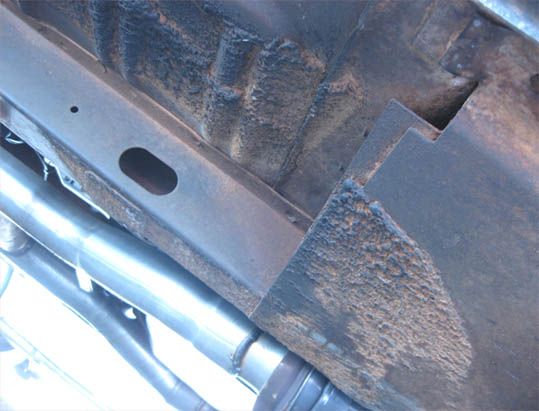
Sorry long post - if something is not clear or if you need some additional shots please ask.
« Last Edit: September 09, 2012, 08:37:15 PM by J_Speegle »
Jeff Speegle

Anything worth doing is worth doing concours ;)

Offline 187813

  • Newbie
  • *
  • Posts: 5
Re: Some late 69 NJ undercarriage detail questions
« Reply #8 on: September 09, 2012, 10:05:15 PM »
Thanks Jeff. It does confirm what I've seen on several NJ cars - more sound deadener than we see on some restored cars. It's hard to tell in this area (I'm in CT) what was originally applied and what was put on later in the car's life. Ashamed as I am to admit it, I was guilty of undercoating cars that I drove in the late 70's and early 80's before I knew better. These pics will help a lot on the Mach 1 - I really appreciate your time and efforts!

Offline J_Speegle

  • Administrator
  • Hero Member
  • *****
  • Posts: 24232
Re: Some late 69 NJ undercarriage detail questions
« Reply #9 on: September 09, 2012, 10:55:30 PM »
Thanks Jeff. It does confirm what I've seen on several NJ cars - more sound deadener than we see on some restored cars. ..........

Yes an often skipped/missed detail - not easy to find a good product, now a days, to do the task with. This is the one area I was not happy with at all on the 69 Shelby I did two years ago. Put some stuff on - but not even close as to thickness or texture.


As for your first comments

Hi everyone, just want to say there is a wealth of information here and it's a great help. Back in the 80's we had to go to shows, look at cars, bother owners, take pictures (and get them 'developed'), and rely on the available info at the time. Now with sites like this, it almost feels like cheating....

Fully understand - some suggest that some sites spoil owners and builders today with allot of information just a mouse click away. But I know that you realize how much time it can take to find one detail especially in the past. We accept that allot just don't want to get their hands dirty or spend hours marching through yards and cars even though it can be very rewarding if you watch out for the wasps, posion ivy, dogs, mud, sharp edges.........

Anyway would suggest that in general, it was never the best choice to use show cars at shows for examples ;)  But we also realize that the cars are not as accessible as they once were and if no help is provided, we could only guess at what results that would produce (oh that's right it was called the 80-90's ;).

Guess that was one of the main reasons this site was established. We hope that as a group can provide information and examples to those interested in seeking it out, providing techniques and guidance for those who still find pleasure in doing it themselves, and discussing new findings as well as conclusions in a reasonable manner.

Glad to have you and many others here.
Jeff Speegle

Anything worth doing is worth doing concours ;)

Offline drummingrocks

  • Hero Member
  • *****
  • Posts: 1291
Re: Some late 69 NJ undercarriage detail questions
« Reply #10 on: September 22, 2012, 04:19:51 PM »


Not to hijack the thread further, but Jeff, is this application of sound deadener behind the rear seat area and into the gas tank/trunk transition panel typical for a late Metuchen '69?  I'm looking at reproducing the sound deadner on my June 5th, 1969 Metuchen built Mach 1, and although the car still has the original floors, I don't remember taking off any deadener quite this far back when I redid the red oxide on my floorpans.  Stupid me, I didn't get any pictures of that area, but I can't remember it having anything except for red oxide primer behind the rear seat.

Since that detail is long gone on my car, in your opinion should I reproduce such a heavy application of sound deadener behind the rear seat area, or should it taper off and stop closer to the rear seat?  I'm just curious as to what you've found in your travels.  I planned on using Spectrum Sludge to reproduce the original sound deadener, and I'd hate to get it applied and realize I'd replicated a detail the car never had originally!  Thanks!
Too much junk, too little time.

Offline J_Speegle

  • Administrator
  • Hero Member
  • *****
  • Posts: 24232
Re: Some late 69 NJ undercarriage detail questions
« Reply #11 on: September 22, 2012, 06:13:00 PM »
Not to hijack the thread further, but Jeff,............

No problem seems to be on the same subject


Since that detail is long gone on my car, in your opinion should I reproduce such a heavy application of sound deadener behind the rear seat area, or should it taper off and stop closer to the rear seat?  I'm just curious as to what you've found in your travels.

AT this point, based on the late 69 NJ cars I've seen  I would say that it was typical that the workers applied the sound deadener on the floor pans, inside the frame rails behind the rear seat base, tapering off over the rear end or slightly rearward of that location


I planned on using Spectrum Sludge to reproduce the original sound deadener, and I'd hate to get it applied and realize I'd replicated a detail the car never had originally!  Thanks!


Have you tried spray the stuff like they indicate? Have not had an opportunity to do that as of yet - if it works it should provide the thickness of the original stuff. So disliked the light weight stuff I choose to use on the 69 Shelby - but we learn each time and hopefully from others ;)

Let us know (see) how it works
Jeff Speegle

Anything worth doing is worth doing concours ;)

Offline drummingrocks

  • Hero Member
  • *****
  • Posts: 1291
Re: Some late 69 NJ undercarriage detail questions
« Reply #12 on: September 23, 2012, 05:00:36 PM »
Have you tried spray the stuff like they indicate? Have not had an opportunity to do that as of yet - if it works it should provide the thickness of the original stuff. So disliked the light weight stuff I choose to use on the 69 Shelby - but we learn each time and hopefully from others ;)

Let us know (see) how it works.

I've used Spectrum Sludge on a previous project ('66 GT fastback), but from what I remember, it was way too thick to be sprayed.  The consistency reminded me of Bondo, and I remember having a really difficult time putting it on and getting it to look like much of anything. 

As far as sprayable stuff, I've used Lord Fusor sprayable wheelhouse deadener.  It takes a special gun.  It's fairly easy to spray, but it reminds me of what you put on the Shelby you were describing--even after several coats, it simply isn't thick enough to look like the stuff Ford used.

Anyways, this sounds kind of dumb, but given my previous experience with trying to apply Spectrum Sludge, I thought about practicing applying it beforehand on a piece of scrap metal using something like Bondo or maybe even something like peanut butter. From what I remember before, I couldn't come close to getting the right look.  This time, I'll try putting it on with a paint brush.  Before, I used a Bondo paddle.  I don't want to waste this stuff, especially when it's $70/gal!
Too much junk, too little time.

Offline J_Speegle

  • Administrator
  • Hero Member
  • *****
  • Posts: 24232
Re: Some late 69 NJ undercarriage detail questions
« Reply #13 on: September 23, 2012, 05:46:30 PM »
I found mine was more like Coolwhip but the instuctions there is a mixture that is sprayable. I used a big house brush (after applying with a platic putty knife then spreading with a paint stick)  Then overspraying it with spray undercoating for the fine textutre and edges I wanted - but this was on the wheel well - Might have tried the same on the floor with only the sludge on the heavy areas then the load Fusion on the lighter areas and edges
Jeff Speegle

Anything worth doing is worth doing concours ;)

Offline drummingrocks

  • Hero Member
  • *****
  • Posts: 1291
Re: Some late 69 NJ undercarriage detail questions
« Reply #14 on: September 23, 2012, 06:55:50 PM »
Thanks for the ideas--I'll give it a try and post what I come up with.
Too much junk, too little time.